So, a few weeks ago I asked about various ideas for shooting benches; and I got a lot of feedback, most of which weren't exactly what I was looking for, so I went out and designed my own.
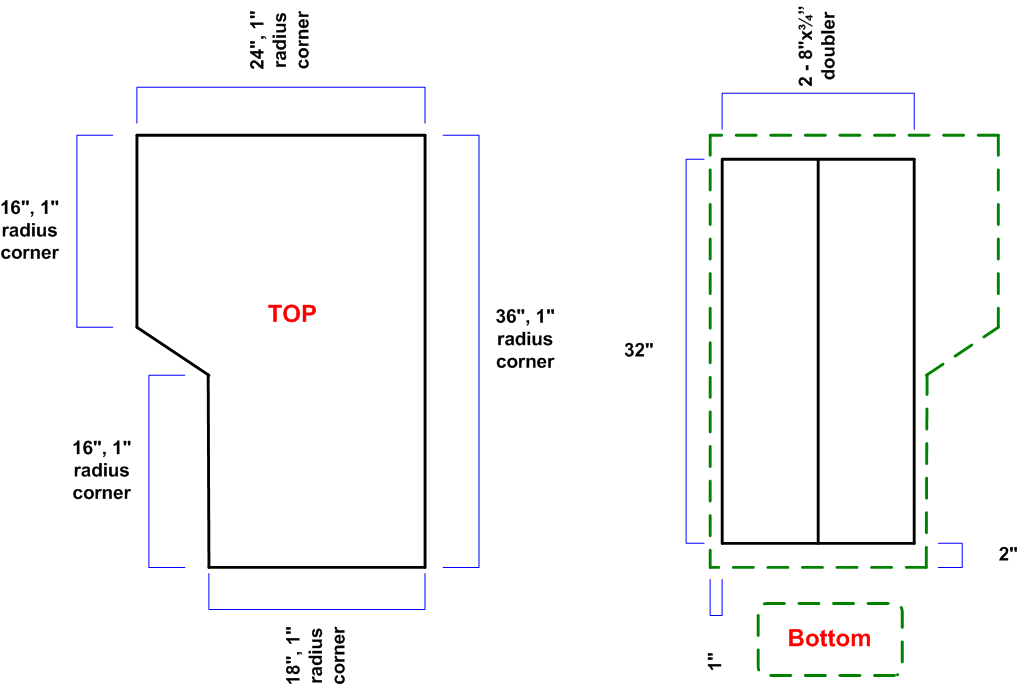
It's essentially the same as the booger bench really, though I used full length doublers, and a single cutout.
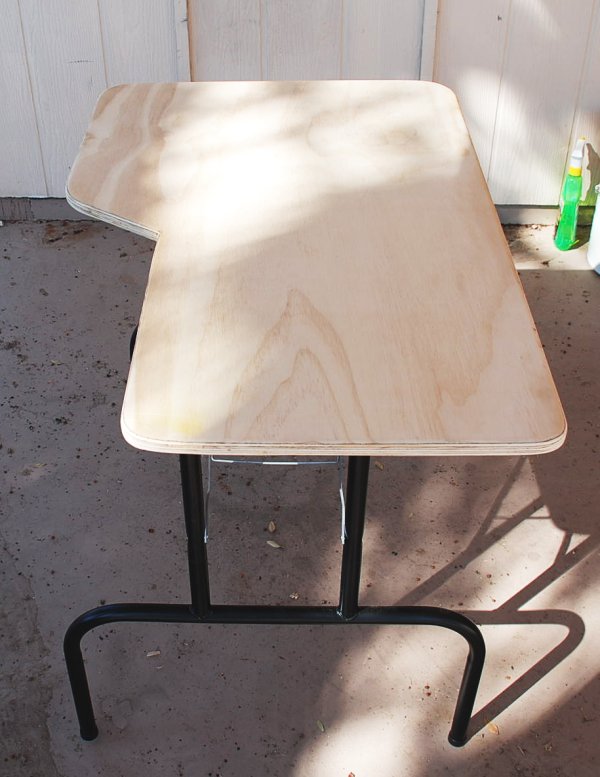
Excuse the shadowed pics, the daylight was so bright it was washing out on the bare wood.
Also, since I was building for both myself, and for a friend who drives a Camry, we went a little shorter; and that let us use some plywood left over from a previous project.
Basically all it takes is about 1/3 sheet of plywood (the top is 1/4 sheet, but you need doublers for the table legs), figure on being able to make 2 from 1 sheet of plywood, with quite a bit left over. You could in theory build it with jsut 1/4 sheet, but hoenstly, plywood is relatively cheap, and the cost differen between 1/2 and 1/4 sheet isn't going to be big enough to make it worth the trouble, or the slight compromise in strength in using short doublers to save plywood.
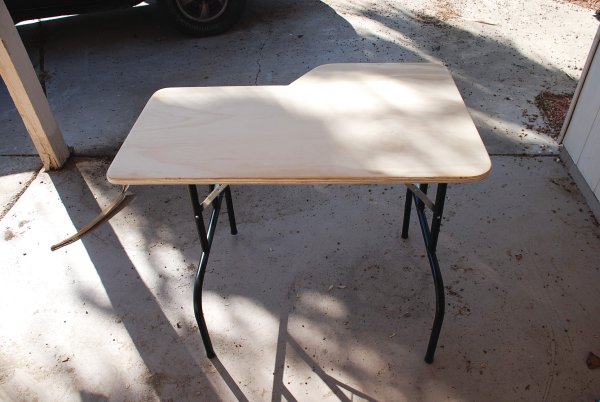
We built them 24” wide and 36” long to easily fit into a car trunk. I used 3/4” hardwood A/B ply, a set of Waddell legs, and a bunch of 1-1/4” galvanzied deck screws.
The bench top is two rip cuts for dimension, then a slot cut for the bench cutout (I built it with a single side cutout), six scroll cuts to round the corners, a full permitier 1/4” roundover around the top, and a rough and finish sand.

The doublers are jsut chopped for length, sanded, and then glued and screwed into the bottom, to provide a stable foundation for the legs, and to reinforce the top. This is one STRONG bench.

It takes me about two hours to build one, start to finish (well, actually that's un-finished, but fully constructed); but if I were building a bunch of them it would probably only be an hour a piece because I could use the same setups over and over again.
Rather than use two full length doublers as I show in the plan views, I used the scraps of my previous cuts (oh and I freehand cut 2” radius corners, because I like them better than 1"). Either way, it’s plenty strong; though with the two full length doublers, glued and screwed, I’d guess the top would handle several thousand pounds without splitting.
 The depth of the shooters cutout we chose, was about as deep as we could get with the width of the legs we chose, and still have the legs centered. If we offset the legs we could make a much deeper cutout, but I don’t think thats necessary; and as it is, the thing is stable as concrete. Oh, and it would also be very easy to do a double cutout, as in the original booger bench.
 It would be easy to build a screw in leg variant that WOULD take several thousand pounds of pressure, be even more stable, and have as deep a cutout as you wanted; using splayed brackets and threaded pipe legs; but I prefer the quick and tidy portability of the folding leg version.
I believe Waddell rates their legs for 400lbs; I know that were it the right height I would have no qualms about sitting on this table, it's that solid.
Oh, and we chose the 24” x 36” dimensions for portability (JohnOC drives a Camry, and biggger table might not fit), and convenience using the plywood I had on hand; it would be trivial to extend the dimensions out to as much as 48"x32" and still only use a half sheet of plywood.
Honestly though, I like the smaller size. It’s tidy and convenient; and it makes a good lunch table as well.

The cost? About $50 assuming you have the tools necessary to build it (Circular saw, power drill, skill saw, router, power sander); and about $300 if you don't.
The cheapest way to go is with some random rough grade plywood, but I'd really recommend against that. The generic 3/4” “hardwood” plywood that I used runs about $35 a sheet, and it works just fine. You might save $10 or $15 on wood, but your result won't be as good.
If you want better plywood, or thicker plywood, it’s more expensive. Going up to a full double layer of plywood would bring your wood costs way up; but that would make it 1.5” thick, and suitable for long term use as a workbench or something similar.
You could also do a double layer of 1/2” ply instead, for a solid inch of thickness; and it would be quite strong, lighter than the double 3/4", and probably handier; plus 1/2" thicnkess of good hardwood plywood is a LOT cheaper than 3/4".
Hell, if you have access to a marine supply place, they sell teak plywood that would look awesome and last about 1000 years; but would be a bit expensive.
If you are going to do any gunsmithing (or other work with hammering, clamping, and the use of solvents) on it I suggest surfacing it with 1/4” MDO board, or a hard surfaced laminate or particle board; which I would run you an extra $20 or so.
If you want a bigger one, you can do that, all the way up to as I said 48x24, or 48x32; which in addition to being a shooting bench, would make a decent portable picnic table for four to six people; a good folding desk or worktable etc… and the expense is just about the same. The wood costs the same, but it’s a bit more time, and a bit of extra sanding, gluing, and screwing.
You actually could go bigger, but I wouldnt recommend it; the table wouldn’t be as stable, and you'd use more plywood.
For finishing, I recommend marine spar varnish or something similar. I used six coats of heavy duty acrylic, but that's because I needed it dry in 24 hours; otherwise I'd have put 4 coats of spar varnish on.
For a seriously tough finish, seal it, and put three coats of marine varnish on it; but don’t expect a furniture grade finish. If you want that, you need to use more expensive plywood, like a good oak, beech, walnut, or birch furniture grade wood. Then you have to do a LOT of finish sanding; including sanding between coats; and put on three or four more, thinner coats; but honestly why bother.
I'll post some pictures of the fully finished benches tomorrow after the last coat of acrylic dries.